Teams App/Bot Setup
This document details how to set up your Azure/Teams instance for the Connectifi Teams App. It is a step by step description of the whole process which involves logging into Azure Portal, Connectifi Admin Panel and MS Teams dev site.
Overview
The document outlines a sequential, multi-step process to setup Azure, Connectifi and Teams for interoperability.
Since each step essentially deals with a different administration system, the complete setup requires various roles/permissions. These roles can be held by any number of users.
Roles and permissions
The roles can be broken down as follows:
- Azure Admin - Azure management account and subscription
- Connectifi Admin - administrator access to the Connectifi admin UI
- Teams Developer - ability to manage teams apps in the teams dev portal
- Teams Admin - ability to approve publish requests from the teams developer
These roles are required for the following steps.
Setup Process Overview
-
Creating the Azure Application - This involves logging into the Azure portal and creating an Application. The outcome of this step is a set of important parameters used in the next step (e.g. application client id/secret).
-
Creating the application in the Connectifi Admin site - Here we use the tenant id and client id/secret to configure the Connectifi Teams app. Once the Connectifi Teams app has been added, service callback urls are displayed and a teams manifest can be downloaded.
-
Creating the Azure Bot resource - This involves logging into the Azure portal and creating an Azure Bot resource which is tied to URL/URI parameters from the Connectifi admin.
-
Creating the application in the Teams Developer portal - This step ties everything together. As mentioned, the manifest can be downloaded from the Connectifi admin site or supplied by the Connectifi administrator and then uploaded into the Teams developer portal.
Step 1: Azure App Registration
The first step is to create a new application in the Azure portal and that requires the Azure admin role. At the end of this step, you will have the two most important settings, the app client id and secret. Store these values for the following sections, the app client secret is only revealed once at creation time.
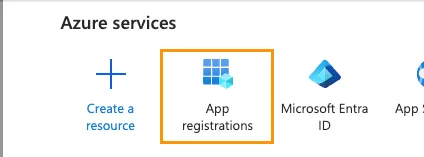
Follow the link below or go to Azure Home > App Registrations: https://portal.azure.com/#view/Microsoft_AAD_RegisteredApps/ApplicationsListBlade
You can also get to this from the Azure home page.
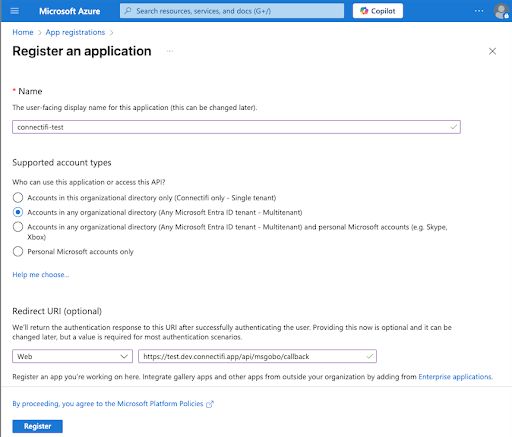
Step 1.1 - New App Registration
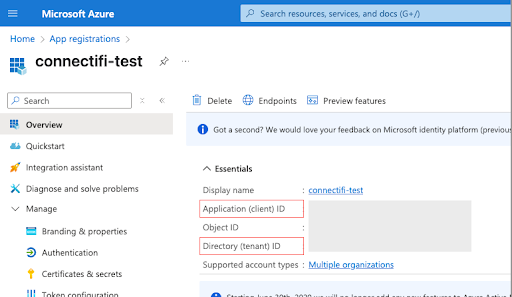
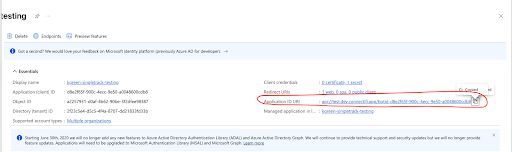
Select New Registration and then provide a name (user facing, can be changed later) and then select the appropriate account type - Multitenant so far. Once the registration is created, take note of the Application (client) ID and Directory (tenant) ID. These two IDs are needed later but can also be retrieved at any time.
You will need to set the Redirect URI by first selecting “Web” from the dropdown and then entering your server’s teams auth page in the text box, for example:
https://{server fully qualified domain}/api/msgobo/callbackClick the Register button in the bottom left corner.
It should look something like this:
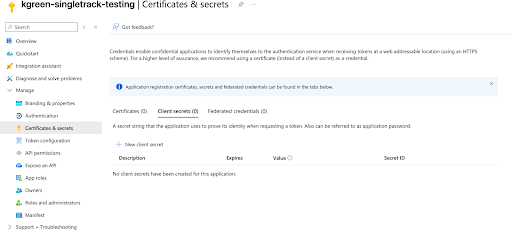
Step 1.2 - App Client Secret
In the left hand pane under Manage, select Certificates & secrets. Hit the New Client Secret button in the middle of the page. Give the secret a nice name in the Add Client Secret panel and then hit the Add button.
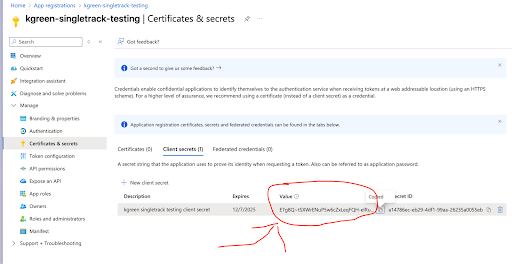
Once the client secret is created, note the Value property. It is very important to copy this value down now because it can NOT be retrieved later. You will not need the Secret ID.
Step 1.3 - Set the API Endpoint ID
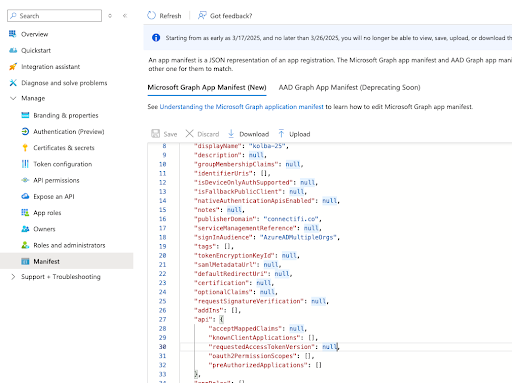
Note: Due to a recent change in enforcement patterns by Microsoft, before adding in the Application ID URI you’ll need to edit the Manifest to indicate that we’re using v2.0 Entra ID tokens. You do this by editing the manifest file in the api section.
- Go to: https://aka.ms/ra/prod
- Find your app
- Go to Manage > Manifest in the left nav
- Check the requestedAccessTokenVersion prop under api
- Change value of null to 2
- Save changes
More info here .
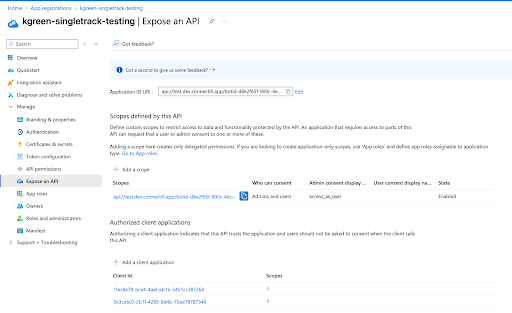
This is where we define our “endpoint id” which will be used when setting up the Azure Bot resource. This URI looks similar to a url but is just an identifier and it must be in the correct format.
To set the API endpoint, select Expose an API in the left nav and then click Add next to Application ID URI and set the Application ID URI to the following format:
api://{server fully qualified domain}/botid-{App Client ID}Note: The App Client ID will appear as the default API value when you select Add. You can also go to the ‘Overview’ for your app (first item in the left nav) to get the App Client ID.
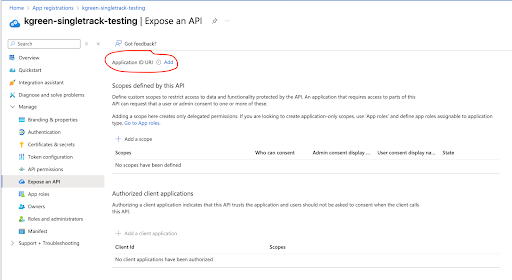
Step 1.4 - Adding a scope
On the same page, Expose an API, click Add a scope and then fill out the details as follows:
- Set the Scope name to “access_as_user”
- Set the Who can consent? selector to “Admins and users”
- Fill in the fields for configuring the admin and user consent prompts with values that are appropriate for the access_as_user scope. Suggestions:
- Admin consent display name: Teams can access the user’s profile
- Admin consent description: Allows Teams to call the app’s web APIs as the current user.
- User consent display name: Teams can access your user profile and make requests on your behalf
- User consent description: Teams can access your user profile and make requests on your behalf
- Ensure that State is set to Enabled
- Click on Add scope button
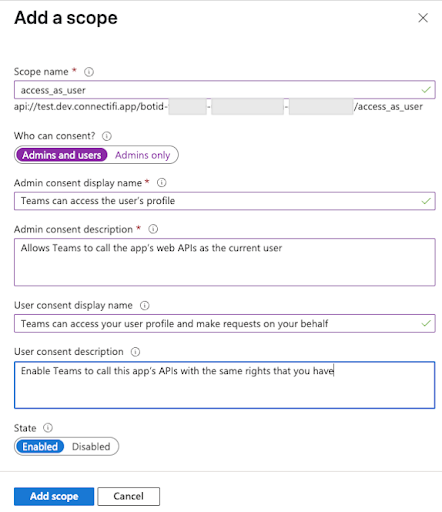
Note: The domain part of the Scope name displayed just below the text field should automatically match the Application ID URI set in the previous step, with /access_as_user appended to the end.
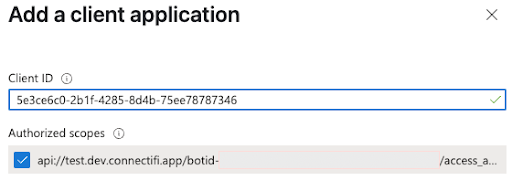
Step 1.5 - Authorize Client Applications
Again on the same page, Expose an API, click the + Add a client application button for each of the items in the table below, using the Microsoft ClientIDs provided below:
| Client ID | Client Type |
|---|---|
| 1fec8e78-bce4-4aaf-ab1b-5451cc387264 | Teams mobile/desktop application |
| 5e3ce6c0-2b1f-4285-8d4b-75ee78787346 | Teams web application |
The Expose an API section should now look something like this:
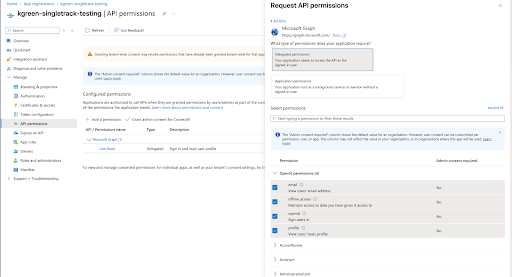
Step 1.6 - API Permissions
Navigate to API Permissions in the left nav and select Add a Permission. Next, select Microsoft Graph → Delegated permissions, add the following permissions, and Grant Admin Consent if required:
- User.Read (enabled by default)
- offline_access
- openId
- profile
- Chat.Read
- Chat.ReadBasic
For Channel Management features, the following Application permissions will need to be added as well:
- Team.ReadBasic.All
- Team.Create
- Channel.Create
- Channel.ReadBasic.All
Note: For Application permissions, these do NOT get listed in the OAuth Connection step in 3.4 (only the Delegated permissions).
App Registration Complete
At this point our Azure app registration is complete and we have all the information we need for the subsequent steps of this doc. The config values we’ll need later are:
- Application (client) ID
- Client Secret Value
- Directory (tenant) ID
The Client Secret Value you saved in the previous Step 1.2 and the Application (client) ID and Directory (tenant) ID can be found on the Overview page.
Step 2: Configure a Directory and Application in Connectifi
This step involves creating the application on the Connectifi side and requires the Connectifi admin role. The step also requires the application client id/secret from the Azure Application setup.
Step 2.1 - Create a Directory
Create a new directory or select an existing directory, directories allow you to define which applications can “talk” to each other.
Step 2.2 - Add the teams app
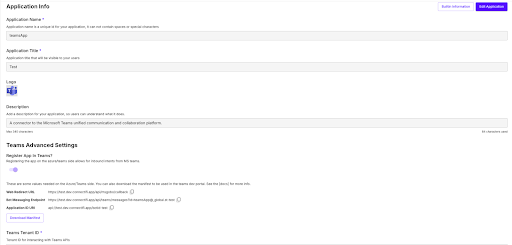
Once inside the directory, click the “Add Application” button and select the teams app. Fill out the basic information and then click next. On the next screen, check the “Register app in teams”. Once that is checked, fill out all the additional required fields.
Note: you can leave Teams App ID blank, this will get filled in with a value from the Teams Developer Portal in a later step.
Click Next, preview your settings and then click finish.
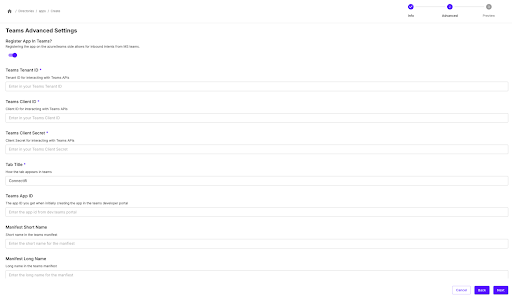
Once the app is saved, you can now view the URLs you’ll need in the Azure portal and download the manifest you’ll need in the Teams developer site. The Messaging Endpoint url is needed in the following section 3.3.
Step 3: Azure Bot Resource
You will need the Azure admin role for this section and in particular an Azure subscription. The messaging endpoint is also needed, this should be supplied by the Connectifi administrator.
Step 3.1 - Create Bot Resource
To create the resource, open up Azure portal again, go to the home page and select Create a Resource. https://portal.azure.com/
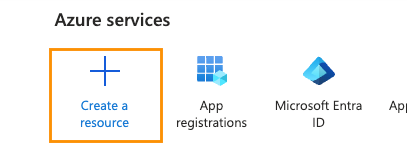
Search for “azure bot” in the resources page. When you see the Azure Bot card, click the Create → Azure Bot button and fill out the form:
- Fill out the Bot handle field (not sure if/where this is displayed afterwards).
- Select an Azure subscription and resource group
- The default Global section for Data residency is fine to keep as is.
- Select the appropriate pricing tier (free for dev)
- Set the Type of App - Single Tenant
- Set the Creation type to “use existing app registration” and then set the App Id to the Application (client) ID from Step 1.
Click Review + create and then Create.
You should see something like “your deployment is complete”, now click the Go to resource button.
Step 3.2 - Add the Teams Channel
Now we need to associate the teams channel to the resource so select Settings → Channels from the left menu. Find the Microsoft Teams channel and click on it, accept terms Agree and then Apply.
Step 3.3 - Set the Message Endpoint
Now we need to set the Message Endpoint (our web service url) so select Settings → Configuration from the left nav and set the Messaging endpoint to the backend web service url, which is in the format:
https://<backend-host>/api/teams/messages?id=<connectifi full app id>Hit the Apply button.
Note: The messaging endpoint can be obtained from the Connectifi Admin.
Step 3.4 - Add OAuth Connection
We need to add the client id/secret obtained earlier so the bot can use SSO and make calls on behalf of the user. Click the Add OAuth Connection Settings button (this is in Settings → Configuration which you should still be on) and then fill out the form.
- Enter a name for your new Connection setting.
- In the Service Provider dropdown, select Azure Active Directory v2
- Enter in the Client id (value is Application (client) ID) and Client secret obtained in step 1.1 and 2.1
- For the Token Exchange URL use the Application ID URI obtained in step 2.2, which can be found in the App registrations Overview page
- Specify “common” as the Tenant ID. If you are using Single Tenant app registration then set your tenant Id where the bot is registered.
- Add all the scopes (comma separated) configured above when specifying permissions to downstream APIs in Step 2.4, e.g (User.Read,email,offline_access,openid,profile,Chat.Read,Chat.ReadBasic)
- Click “Save” and then “Apply”
Step 4: Create the App in Teams Developer Portal
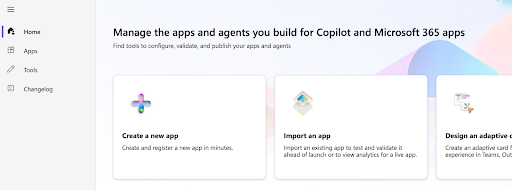
This step requires the Teams developer role and it involves creating an application and relaying the application ID to the Connectifi administrator. Open up the Teams dev portal at https://dev.teams.microsoft.com/home and click on Create a new app.
Enter a name and click Add. Take note of the generated app id.
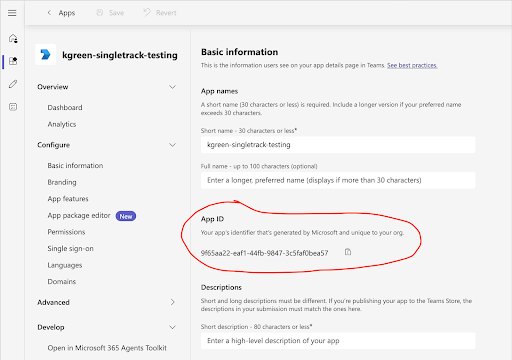
Go back to the Connectifi Admin, edit your Teams app and add the App ID from above as the Teams App ID. Save the change, then download the manifest file from the Application Info screen.
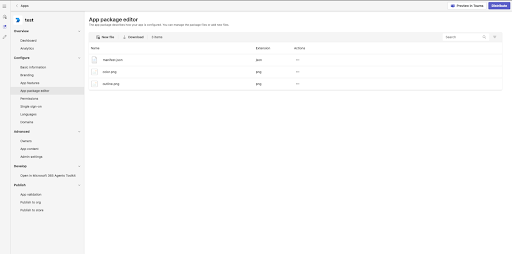
Step 4.1 - Import Manifest
The Connectifi administrator will supply the manifest, once that is on hand, select the App Package Editor in the left hand nav, open the manifest.json file. Paste in the manifest from Connectifi, click Save, then Update, then Save again.
Step 4.2 - Validate and Publish
From the left hand nav, select the Publish / App Validation menu. Run a validation on your app.
Once the validation requirements are satisfied, publish the app.
An MS teams admin will need to approve an application when it is first published or for any updates and the update must include a version increment, you can increment the version in Configure / Basic Information https://admin.teams.microsoft.com/dashboard .